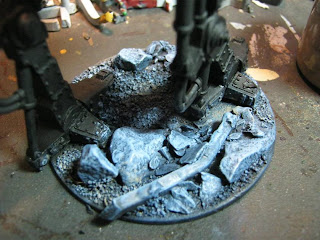
Pintado de peanas para combate Urbano
Painting a base for city combat
En esta entrada os quiero enseñar el proceso que sigo para pintar mis peanas de guardia renegada ambientadas en el combate urbano. Tambien he hecho una version en video pero esta en ingles.
In this post I wanted to show the process I followed to paint my renegade guard bases set in urban combat. You can also follow the video version of the tutorial.
Preparando la peana
Para este articulo voy a usar la pena de un Sentinel. Esta vez opte por primero pegar el Sentinel en la base. Al tratarse de una figura pesada ya que es de metal quería que la unión con la base fuera buena. Una vez figura esta fijada a la base con cola blanca pego los elementos de escenografía mas grandes, piedras grandes y un trozo de viga hecho con un trozo de matriz. Cuando la cola y esta seca pongo un poco de grava gruesa y finalmente pongo la gravilla mas fina. Espero 24 horas para asegurarme que la cola se ha secado bien y entonces haga la imprimación en negro.
In this post I wanted to show the process I followed to paint my renegade guard bases set in urban combat.
Preparing the base
For this article I will use the base of an old Sentinel miniature (previous edition of metal). This time choose to first glue the Sentinel on base. Being a heavy figure because it is made of metal I wanted a good union. Once figure is well glued to the base, using P.V.A. glue I stick the larger terrain pieces, large rocks and a piece of beam made with a piece of sprue. When the glue is dried I put some coarse gravel and finally I put the finer gravel. I waited 24 hours to be sure the glue has dried well and then I did the black primer.
Pintado general
Como veréis la primera parte de la figura que pinto es la base, el motivo es que voy a usar pincel seco un poco basto con lo que quiero evitar manchar la figura una vez pintada.
Para el pintado general de la peana voy a usar varias capas de pincel seco.
La primera capa que aplico es de Fenris Grey, para esta capa no seco mucho el pincel ya que quiero que cubra el negro.
Basic Painting
As you can see tthe base it he first part of the miniature that I painted, the reason is that I used a bit rough dry brush by which I avoid staining figure once painted.
For basic painting of the base I used several layers of dry brush.
The first layer applied is Fenris Grey, for this layer I did not dry the brush much as I want to cover the black.
Después pincel seco con Hideous Blue, este es un color que conservo de las primeras gamas de pinturas de GW. Se trata de un color gris azulado.
Then I applied dry brush of Hideous Blue, This color is form very old GW line up. It is a blueish grey color.
La última capa la hago muy suave con Space Wolves Grey, es un color gris casi blanco y un poco azulado.
Last layer is done very softly with Space Wolves Grey, Color from previous range a very light blueish grey.
Para romper la uniformidad después aplico pincel seco con otros colores (tonos de marrón o ocres). En esta caso aplique marrón claro.
To break the uniformity I will recommend to do soft dry brush with other colors (browns or ochres can be a good choice). In that case I plied very light brownish color.
Los detalles
En este caso he decidido añadir un par de detalles en la pena, se trata de una viga y de una arma abandonada. El arma esta imprimada en negro y la coloco tirada encima de las piedras
The details
In that base I also decided to add a couple of details, a metal beam and a abandoned weapon. The weapon was primed in black and glued to the base after the dray brush was applied.
Como son partes metálicas les doy una capa de Leadbelcher
Firs layer I applied was Leadbelcher
Después aplico Ironbreaker
Then Ironbreaker is applied
Cuando la pintura esta bien seca hago un lavado con Agrax Earthshade, en esta caso no me limito a la zonas metálicas también lo aplico en otras zonas para representar manchas de aceite, sangre o suciedad producidas durante la batalla.
When metallic paints are fully dry I did a wash with Agrax Earthshade, in that case I also did some washes in other parts of the base to simulate stains of oil, blood or any type of dirtiness from previous fights.
Una vez el lavado se haya secado se vera mate asi que no hay qeu preocuparse si se ven brillos después de aplicar. El último toque que hago es aplicar pigmentos Light Rust de Forge World para hacer óxidos sobre la viga.
Once the wash is dried up appearance will be completely matt, do not worry if you see bright during the application of a wash. To finalize I applied some Light Rust from the Weathering Powders of Forge World to create some oxide spots on the beam.
Hasta qui llega este mini-tutorial sobre el pintado de la peana urbana. Espero que os sea útil.
That´s all for this mini-tutorial about city base. I hope it has been useful.


Comentarios
Publicar un comentario